


There are several commercial and open source virtualization solutions ranging from small to large enterprises.
In this post I will describe the process of installing a debian based headless server that will host via virtualbox several instances of other debian based servers. The administration of virtualbox will be accomplished via phpvirtualbox, an open source, AJAX implementation of the VirtualBox user interface written in PHP.
1) Physical setup
A i7 CPU server was chosen with 32 GB of RAM. 2 1TB system disks were chosen and 4 more 4TB SATA disks were added for the hosting of the virtualbox images.
1) Installing the base server.
We used a default debian testing (jessie) installation with no graphical user interface, just a SSH server. Software RAID1 was chosen for system disks and additional storage space.
2) Installing virtualbox.
Virtualbox can be download via https://www.virtualbox.org/wiki/Linux_Downloads. Since no jessie deb package exists at this time the equivalent wheezy package was used (virtualbox-4.3_4.3.6-91406~Debian~wheezy_amd64.deb).
The installation of virtualbox was accomplished via
sudo dpkg -i virtualbox-4.3_4.3.6-91406~Debian~wheezy_amd64.deb
3) Installing vboxweb-service
The default virtualbox installation does not allow the vboxweb-service to start, which is needed for phpvirtualbox to work.
First create a system user called vbox
sudo useradd -m vbox
sudo passwd vbox
Create the file /etc/default/virtualbox and put the line
VBOXWEB_USER=vbox
in it (so that the VirtualBox SOAP API runs as the user vbox). Update vboxweb-service to start on system boot and start the service
sudo update-rc.d vboxweb-service defaults
sudo /etc/init.d/vboxweb-service start
Additionally you can install Oracle’s extension pack in order to view the VMs console via RDP. Download the extension pack via https://www.virtualbox.org/wiki/Downloads (in my case Oracle_VM_VirtualBox_Extension_Pack-4.3.6-91406.vbox-extpack). Install it via the following command line.
sudo VBoxManage extpack install Oracle_VM_VirtualBox_Extension_Pack-4.3.6-91406.vbox-extpack
4) Installing phpvirtualbox
The prerequisites for phpvirtualbox can be installed via the following command:
sudo apt-get install apache2 apache2-utils apache2.2-bin apache2 apache2-doc apache2-suexec libapache2-mod-php5 libapr1 libaprutil1 libaprutil1-dbd-sqlite3 libaprutil1-ldap libapr1 php5-common php5-mysql php-pear wget
Download phpvirtualbox via http://sourceforge.net/projects/phpvirtualbox/. In our case phpvirtualbox-4.3-1.zip was used.
Since no other sites will be hosted on the server, unzip phpvirtualbox-4.3-1.zip to /var/www/html deleting its contents.
cd /var/www/html
cp config.php-example config.php
vi config.php
and change the following lines
var $username = ‘vbox’;
var $password = ‘thePasswordYouUsed’;
By visiting http://serverIP/ the phpvirtualbox frontend should be available. The default username and password are admin and admin.
After logging in change the default password by visiting File > Change Password
https://www.virtualbox.org/wiki/Downloads
5) Adding virtualbox images and changing the settings for the images to boot automatically
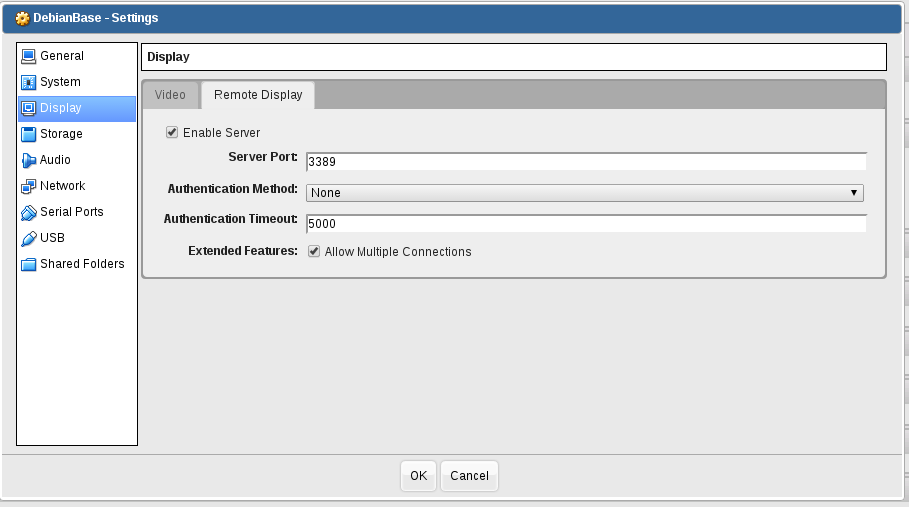
At this point you can either create or import images. I had several images already exported to OVA format, which can be easily imported via phpvirtualbox frontend. Note that bridged network was chosen. To include remote display use the following settings:
To set some images to start automatically the following procedure is used:
Add the following two lines to /etc/defaults/virtualbox
VBOXAUTOSTART_DB=/etc/vbox
VBOXAUTOSTART_CONFIG=/etc/vbox/autostart.conf
and then
sudo chgrp vbox /etc/vbox
sudo chmod 1775 /etc/vbox
Edit /etc/vbox/autostart.conf to include
# Default policy is to deny starting a VM, the other option is “allow”.
default_policy = deny# user vbox is allowed to start virtual machines but starting them
# will be delayed for 10 seconds
vbox = {
allow = true
startup_delay = 10
}
As the cbox user, set the autostart database directory
VBoxManage setproperty autostartdbpath /etc/vbox
and choose which VMs should autostart
VBoxManage modifyvm VMName –autostart-enabled on
After executing this command, you should have vbox.start file under /etc/vbox directory.
Restart the vboxautostart-service via
service vboxautostart-service stop
service vboxautostart-service start


